To contact us Click
HERE
Taking great pictures of your kids by the Christmas tree can be challenging. This week I tried to figure out how to take better pictures of my kids in front of our Christmas tree. I’ve put together some tips and things to try to get the kind of photos you want.
1. Turn off Your Camera’s Flash
No matter what kind of camera you have, and what your lighting conditions are, nothing will take the magic out of your Christmas tree photos more than using your camera’s built in flash.


2. Pay attention to the Background and Foreground of your Photo
No matter how good your photo is, it’s still going to look like crap if there’s a bunch of junk cluttering it up. (Like in the photo above…)

At least clear a path.
3. Practice First With a Doll or Stuffed Animal
Stuffed animals are much more patient subjects than children. Be sure that you have an idea of what you want to do before you involve your kids. You’re probably still going to have to make some adjustments. Kids move around a lot more than inanimate objects so you may have to increase your ISO and reduce your shutter speed (more on that on point 10) but at least you’ll have a starting point.

You’re going to have a limited timeframe so you might as well make them count.
4. Keep Your Camera Steady
Unless your room is really well lit, you’re probably going to be dealing with a lower light setting. To get a good exposure you’re likely going to have to use longer shutter speeds (so your camera takes a longer time to take the picture) This is going to make it important to keep your camera steady so that you’re not getting movement from camera shake. If you do capture any movement, it’s better for it to be because your kid is moving not you.
If you have one, you can use a tripod, but you can also use the ground, a stack of books, a table etc. You may also want to consider a remote for your camera (surprisingly affordable) or the timer on your camera (probably only useful if you can get your kids to stay still-ish).

I’m pretty sure that tree is not actually moving.
5. Shoot Low to the Ground
If you have small kids you may even want to lie on the ground to get a better angle.

6. Put Your Kid a Few Feet in Front of the Tree
It’s natural to want to put your kid right in front of the tree but you’ll typically have better shots if you move them a few feet away. You’ll be able to see more of the lights on your tree and you’ll be able to manipulate the aperture to blur the background if you want to.

7. Stand Back and Zoom in
Another good strategy is to also increase the distance between you and your child. If you’re farther away, you’ll be able to zoom in which will blur the background which is great for portraits and give the Christmas lights a pretty look.

8. Use Something to Help Keep your Kid From Moving Around
This is important for two reasons – 1. to keep the tree in the background and 2. to reduce motion blur. For older kids, bribery can be a good tactic,, younger kids may benefit from a mark on the floor for where you want them to be. For babies, your best best is going to be an unfamiliar object that you don’t mind being in your shots.

This tree was the perfect distraction.
9. Try to Light up Your Kid’s Face
Depending on the lighting in your house and how much your kids move around, you may want more light to get a good shot. One thing you can try is getting some natural light on your kids face. I tried this below, but my tree is too big for me to move around and my window is right beside the tree making it difficult to get the tree in the background and the sunlight on my child’s face.


This does give a interesting look.
The other option, and the one that will give you the most consistent success, is to use an external flash with the flash pointed at a wall or ceiling. This will light up your child without taking away the beauty of your tree.

Taken with external flash pointed at the wall.
10. Pick Your Camera Settings
Using the above strategies, you may be able to get great pictures just putting your camera on the no flash setting.
If you have a DSLR and want to play around here’s what I found helpful:
- Set your camera to Shutter priority. This will let you manipulate how long light is allowed to hit the sensor. A longer shutter speed will tend to make your christmas lights look prettier but it will also capture more movement from your kids.
- Set your ISO and shutter speed. You want as low an ISO as you can get away with and the longest shutter speed.
- You’ll probably want to start with an ISO of at least 400 and may need to bump it up to upwards of 1600 if your kid is moving around a lot.
- Start with a shutter speed of about 1/2 a second. If you’re getting good pictures try lengthening the shutter speed, if you are getting blurry pictures decrease it.
- Play around with the ISO and shutter speed settings. Increasing the ISO will allow you to use a longer exposure (longer shutter speed). (For more depth on how these are inter-related you can see my post on How to choose what professional mode to use).

It’s not the sharpest image but at least she’s not blurry. Here I had to bump up the ISO to 1600 to get a good image.
A few more of my favorite shots:


Not what I was trying to do, but kind of interesting.
Note: Aside from cropping the above images were not digitally manipulated.
Sources used for this article:
http://www.augustteaphotography.com/taking-pictures-of-your-christmas-tree/
http://www.sarahcblog.com/2011/11/how-to-photograph-kids-in-front-of-the-christmas-tree/
http://faithfulstepsphotography.blogspot.ca/2011/12/photographing-kids-in-in-front-of.html
http://ashleyannphotography.com/blog/2008/12/04/photo-tip-christmas-tree-pics/

 There was also a decent light show after dark!
  Then on May 2nd, I chased in Southern Nebraska where the cap finally broke just before dark. A supercell tried to wrap up above my head!
 Then I captured the best cloud to ground strike I had ever gotten on the way home!
  On May 3rd... I went out around sunset to timelapse some local convection, I also included a timelapse of the supercell developing near Fullerton the previous day. http://www.youtube.com/watch?v=PDiZ1RAS0TIMay 4th was a very frustrating day, where supercells tried to get going and constantly weakened right as we would get to them. Here is a quick shot of some mammatus from a dying storm and then a stack of lightning images after dark near Norfolk.
 May 5th was the worst day of the bunch... a strong cap stopped storms from developing and we basically got a tan with 1000 other chasers. That being said it was great to chat with friends and put some facebook faces to names in the real world. Ill keep you updated here as I get these accounts done! Thanks,Chris

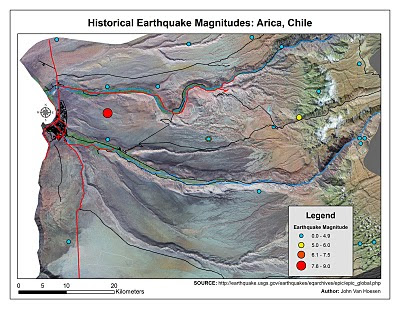
 A simple 3D model illustrating how far both work and home are from the predicted inundation zone. The red flag represents the house, which is approximately 2.0 miles inland and the green flag is work and approximately 0.8 miles inland.