To contact us Click HERE
This summer I had the great pleasure of driving the Needles Highway (South Dakota Highway 87), the Chief Joseph Scenic Byway and the Beartooth All American Road (US Highway 212) for the first time on a trip to Bozeman, MT. I had heard and read great things about these routes and they certainly delivered stunning vistas and fantastic geology (even thought it was raining and incredibly windy in some locations). I've driven across the country a dozen or so times and taken various routes, but I would have to agree that these three highways provide some of the best geology 'watching' in the country!
The Needles Highway was a bit congested since Sturgis was in full swing but luckily the views looking up weren't impeded by the traffic. However, the day was cut short by a hail-producing thunderstorm.
I also stopped at Dead Indian Hill Pass (see my Gigpan of this location here). This stretch of the road is full of switchbacks and quite steep (stay in low gear!):
This is one of my favorite vantage points on the Beartooth - it isn't as 'scenic' as some other photos I took, but I really like the sense of scale, isolation, serenity, and rugged nature of this landscape:
And these are a view other views driving the Beartooth, I think the partly cloudy drizzle really adds a nice effect to this landscape:
The paternoster lake system you can see in the photos from the Beartooth Highway are spectacular, I personally haven't seen such an easily accessible view of this stunning an alpine landscape. I've always enjoyed paternosters, as much for their morphology as the etymology of the word - it roughly translates from Latin as "Lords Prayer" and the fact that they look like a chain of rosary beads. None of the photos or Photosynths do the drives justice, if you like driving and you like geology, then put these on your list of must-do drives in the western United States!
30 Kasım 2012 Cuma
Living in a Seismic Gap Isn't So Bad... Yet.
To contact us Click HERE
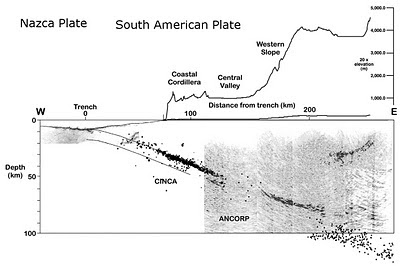
After the magnitude 8.8 (MM) occurred just north of Conception Chile many friends, family, and colleagues were concerned my trip could be canceled. After quelling those fears, many became concerned about the idea that I would be living in 'earthquake and volcano country' with the added threat of possible tsunami activity. So I thought I would create a few maps to hopefully minimize concern while being honest, keeping in mind that anything is possible when you live on an active subduction zone. Subduction in this area occurs between the Nazca and South America Plates, producing dramatic topography, explosive volcanoes and powerful earthquakes.
 Source: Allmendinger and González (2010)
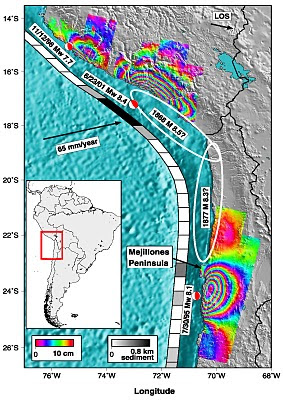
Arica is a coastal city with approximately 190,000 residents located at 18° south latitude on the extreme northwestern edge of Chile. While historical earthquakes have indeed occurred within this region, little seismic activity has occurred here since 1877 because Arica resides within a seismic gap. This is generally not settling news since it represents a region where strain is and has been accumulating without release - meaning a considerable earthquake could hypothetically occur and Spence et al. (1999), and Berrocal et al (2004) have suggested that earthquakes in the late 1990s were precursors to a major event in the Arica 'elbow.' This is illustrated below as white ellipses, representing sections along the subduction zone that haven't experienced slip in the last century.
 Source: Pritchard and Simmons (2006)
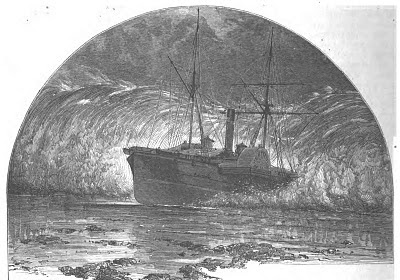
The last major event occurred in 1868 and completely leveled Arica and numerous coastal cities. This earthquake also produced a tsunami that added to both the local devastation and caused damage in New Zealand and Hawaii. This tsunami also left numerous ships stranded on land - similar to the events following the eruption of Krakatoa - such as the U.S. Wateree:
 Source: Scribners Monthly
So I created some simple maps illustrating the tsunami inundation zone and historical earthquakes in the Arica region. To accomplish this I downloaded an inundation map produce by the Chilean Navy, exported the PDF as a tiff file and georeferenced it. Then I digitized the approximate boundary of the inundation zone and draped it over the topography (in relation to where I'm living and working) in ArcGIS and ArcScene to produce the following visualizations:

 A simple 3D model illustrating how far both work and home are from the predicted inundation zone. The red flag represents the house, which is approximately 2.0 miles inland and the green flag is work and approximately 0.8 miles inland.
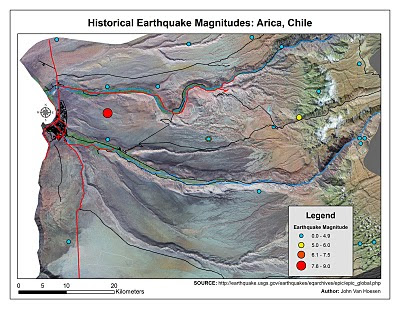
I created the earthquake magnitude maps by draping a Landsat image over a 30-m Aster-derived DEM and incorporating historical seismic data obtained from the USGS. This isn't very helpful other than illustrating how few earthquakes have occurred in this region since 1877. The large earthquake depicted in the center of the map represents the 1868 earthquake that caused so much devastation as depicted below:
 Source: U.S. Library of Congress
So, while the images are visually jolting there's no real way of predicting when an earthquake will occur so I won't - and hopefully friends and family won't - spend too much time worrying about what might happen. I would be more concerned if I was living in San Francisco given the height of their buildings; it is rare to find buildings over 3 stories in Arica and they are all downtown. I'm also confident that if an earthquake occurs that produces a tsunami, even if I'm within the inundation zone, I will have plenty of warning and time to flee the mile inland necessary to avoid harm. After living in Vermont for the last 7 years, I'm a little excited about living on an active margin and embrace all the possible processes that are at work beneath the city. So, to anyone out there who is worrying, don't!
Source: Allmendinger and González (2010)Arica is a coastal city with approximately 190,000 residents located at 18° south latitude on the extreme northwestern edge of Chile. While historical earthquakes have indeed occurred within this region, little seismic activity has occurred here since 1877 because Arica resides within a seismic gap. This is generally not settling news since it represents a region where strain is and has been accumulating without release - meaning a considerable earthquake could hypothetically occur and Spence et al. (1999), and Berrocal et al (2004) have suggested that earthquakes in the late 1990s were precursors to a major event in the Arica 'elbow.' This is illustrated below as white ellipses, representing sections along the subduction zone that haven't experienced slip in the last century.
Source: Pritchard and Simmons (2006)"as the only segment of the Chile-Peru Subduction Zone not to have ruptured within the last 100 years, the north Chile segment is now considered to be a region at high risk from an earthquake similar to, or larger than, the 1877 Tarapaca or Iquique earthquake (Mw 8.3)" - (Benfield 2010)
The last major event occurred in 1868 and completely leveled Arica and numerous coastal cities. This earthquake also produced a tsunami that added to both the local devastation and caused damage in New Zealand and Hawaii. This tsunami also left numerous ships stranded on land - similar to the events following the eruption of Krakatoa - such as the U.S. Wateree:
Source: Scribners MonthlySo I created some simple maps illustrating the tsunami inundation zone and historical earthquakes in the Arica region. To accomplish this I downloaded an inundation map produce by the Chilean Navy, exported the PDF as a tiff file and georeferenced it. Then I digitized the approximate boundary of the inundation zone and draped it over the topography (in relation to where I'm living and working) in ArcGIS and ArcScene to produce the following visualizations:
A simple 3D model illustrating how far both work and home are from the predicted inundation zone. The red flag represents the house, which is approximately 2.0 miles inland and the green flag is work and approximately 0.8 miles inland.I created the earthquake magnitude maps by draping a Landsat image over a 30-m Aster-derived DEM and incorporating historical seismic data obtained from the USGS. This isn't very helpful other than illustrating how few earthquakes have occurred in this region since 1877. The large earthquake depicted in the center of the map represents the 1868 earthquake that caused so much devastation as depicted below:
Source: U.S. Library of CongressSo, while the images are visually jolting there's no real way of predicting when an earthquake will occur so I won't - and hopefully friends and family won't - spend too much time worrying about what might happen. I would be more concerned if I was living in San Francisco given the height of their buildings; it is rare to find buildings over 3 stories in Arica and they are all downtown. I'm also confident that if an earthquake occurs that produces a tsunami, even if I'm within the inundation zone, I will have plenty of warning and time to flee the mile inland necessary to avoid harm. After living in Vermont for the last 7 years, I'm a little excited about living on an active margin and embrace all the possible processes that are at work beneath the city. So, to anyone out there who is worrying, don't!
Professional Camera Modes: How to Decide Which Professional Exposure Mode to Use
To contact us Click HERE
Learning to Use my DSLR – Practical Photography Tutorials
When I wrote my first photography post on taking better pictures of your kids in the snow, I realized that I didn’t know how to choose which professional mode to use. This seems to be a pretty fundamental gap in knowledge so I decided I should figure it out.
It became clear pretty quickly that understanding what exposure is would be a good first step. I won’t go into a lot of detail - hopefully just enough.
Put simply, exposure is how much light is falling on your camera’s image sensor (in the past it would be how much light fell on your film). To get a clear, crisp image you don’t want too much light (overexposed) or too little light (underexposed) landing on your sensor.
Three related factors impact what your exposure will be: ISO, Aperture and Shutter Speed. To get a good exposure these three factors have to be balanced correctly and making changes to one will necessitate making changes to one or both of the other factors.
ISO – This is how sensitive your camera’s sensor is to light. With film cameras, you had different film ‘speeds’ that you had to change if you wanted a different level of sensitivity. For digital cameras you can change the ISO just by manipulating your camera’s settings. The higher the ISO number, the more sensitive your sensor will be to light. This means you don’t need as much light for a good exposure but the image quality is reduced when your sensor is more sensitive.
Eg.
If you are outside on a sunny day, you may want your ISO to be as low as 100.
If you are inside you may want your ISO to be 400 (more sensitive due to less ambient light).
If you are taking a low light photograph you may need to set your ISO to a very high number. (your image will be more grainy but at least you can get the shot).
In general, you want to set your ISO to the lowest number you can to get the best image quality but to get a good exposure, you need to increase the ISO in lower light settings.

By bumping up the ISO to 1600, I was able to get this photo of Nicole is a very dark room.

When you zoom in on the picture you can see the trade off of using the high ISO - although the exposure is pretty good, there is more noise resulting in image that is grainy.
Aperture (or f-stop) – this is how much light passes through your lens at once. A larger aperture will result in more light passing through and a smaller aperture will result in less light passing through. Manipulating the aperture also effects the depth of field (how much of your image is in focus).
Eg.
To get a good exposure outside on a sunny day, you would need a narrower aperture such as f/4.
To get a good exposure in a low light setting you may need an aperture such as f/22.

In these pictures I manipulated the aperture. You can see how it changed the depth of field. In the photo on the right the background is quite blurry and the focus is just on Gordie. In the photo on the right the background is more in focus and pretty distracting.
Shutter Speed – This is how long light is allowed to hit the sensor. The shorter your shutter speed, the less light will hit the sensor. The longer the shutter speed the more motion you will capture as well.
Eg.
On a sunny day you may want a short shutter speed of 1/4000.
In a low light setting you may want to capture light for a longer period of time using a shutter speed of 1/60.

Here’s an example of a long shutter speed with a moving subject. Although in this instance it was not what I had intended, it can be an interesting effect. Kids move so fast it can be helpful to shorten the shutter speed to help photograph them without motion blur.
These three factors are inter-related, so when you change one you may need to change one or more of the others to get a good exposure. For non-professional photographers like myself (and I’m assuming you if you’re reading this) it can be helpful to let your camera make some of the decisions while you manipulate the one you are most interested in. Picking the right professional exposure mode can help you do this.
P – Program Mode:
This mode would be perfect if you want to make some manipulations but have your camera do most of the heavy lifting. In this mode you can change things like the white balance, exposure compensation, ISO, and metering. This would have been perfect for me to use for my post on taking better pictures of your kids in the snow (I used the Aperture Priority Mode instead). I wasn’t trying to change the aperture or shutter speed. This can also be a helpful mode if you are going to be taking photos in a variety of lighting conditions.

In these pictures I was only manipulating the exposure compensation, to brighten up the snow. That would be a great use of Program Mode.
A – Aperture Priority Mode
In this mode, you manipulate your camera’s aperture while your camera handles the rest of the exposure settings. This will allow you to change the depth of field or how much of your photo is in focus. This is particularly great for photographs so your subject is in focus but the background is blurred. You can also use it to make sure that everything in your shot is in focus. You would likely want this mode while photographing landscapes, portraits, architecture, close up photography (think food or flowers) and wildlife.
S – Shutter Priority Mode
This mode is similar to Aperture Priority mode but in this case, you manipulate the shutter speed while your camera handles the rest of the exposure settings. This mode is best to use when your subject is in motion. You can use it freeze the action by setting it to be quick or to show motion by leaving it longer. You would probably want to use this mode if movement was a big aspect of your subject or the photo effect you want. This can also be highly useful for photographing kids!
M – Manual Mode
In this mode, you have the most control, but it’s also the hardest to use. At this stage of my photography I don’t want to use this mode and if you’re reading this I’m assuming you don’t either!
A Word About Scene Modes
Your camera will probably also have a number of pre-set Scene modes. There’s absolutely nothing wrong with trying them out too. Those modes use all the same principles I discussed above – pre-selected to try to create the best exposure for that kind of setting. Eg. the night mode will use a wide aperture to let in a lot of light at once and a longer shutter time, the action mode will use a quick shutter speed. There’s nothing those pre-sets can do that you shouldn’t be able to do yourself.
Learn Along Assignments:
1. Experiment with ISO
- Take your camera into a setting with not much light.
- Put it into Program Mode
- Set your ISO to a really high setting (like 1600)
- Try taking a picture. (Make sure you are keeping your camera steady)
- Now set your ISO to a lower number (like 400).
- Compare your results
2. Experiment with Shutter Speed
- Pick an subject that is moving. (Like your kids!)
- Put your camera into Shutter Priority Mode
- Try taking pictures at different shutter speeds
- Compare your results
3. Experiment with Aperture
Note: this is the hardest one to play around with. My camera will let me set my aperture to settings that don’t work well with my lens. I will be doing a tutorial on using the aperture setting in the near future.
If you would like to play around with it before that here’s what I recommend:
- Set your camera to Aperture Mode.
- Somewhere on your lens it will say something like 1:3.5-5.6G. Start by setting your aperture to within these numbers to start.
- Select an subject that is in front of a busy background. Making sure there is some distance between your subject and the background will make it easier to see the effect.
- Take photos with different aperture settings.
- Compare your results
4. Let me know how it went!
Resources Used for this article:
http://digital-photography-school.com/iso-settings
Nikon D3200 From Snapshots to Great Shots by Rob Sylvanc
Garrett's Log Entry
To contact us Click HERE
Today is the 24th of May, and i had a long day. We started the day by leaving a little earlier then noon to go to the aquarium. An institute that has problems with its mission prerogative. To save animals is important, to enclose and monitor nature is not within that goal. But, it was cool, i saw an octopus! Then we went to Virginia Beach, where the water is suprisingly welcome after getting used to it. Swimming is fun! Sand, clinging to every part of your body, is not. Following that, we had our dinner at a really good pizza place, i had a pitcher of tea! The last activity of my day was a walk along the beach, which was very relaxing, and helped me with my zen, sorta. The moon is behind clouds right now, which makes me a little bit sad, but i am going to bed! Hi mom! This was a blog post by Garrett VanHecke.
"It's Only a Shed"
To contact us Click HERE
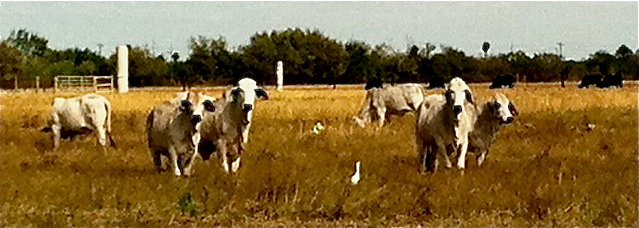
Hi all, Dianne here. As shown above, the cattle next to our dog park have watched our return with interest! Our coach house sits right behind the tree line in the background of the photo.
Not much to update, but I wanted to share a link to a blog which recently showcased our tiny coach house in Texas. Even if you've seen photos of our coach house on our own blog, there are some great photos which really showcase it here:
"It's Only a Shed"
I've added a permanent link to this blog at the left margin of ours, if you are interested in future tiny coach house posts.
Aside from that, here's a quick update:

I've been riding my bike through the state park next door for exercise, and Tuesday morning I came upon this large bobcat.
 He ignored me for a while, turning to look at me from time to time, then hopped into the brush along the road.


This morning on my bike ride I saw a road runner. By the time I got my camera out and rode up to him, he ran into the brush to hide. You can just see his shadow in this photo. Maybe next time....
 Then I had to stop and wait for this flock of chachalachas to cross the road.
 Our plantings are growing like weeds! My tomato plants already have blooms --
They are growing in big pots that we can roll inside in case we get an overnight frost in January.
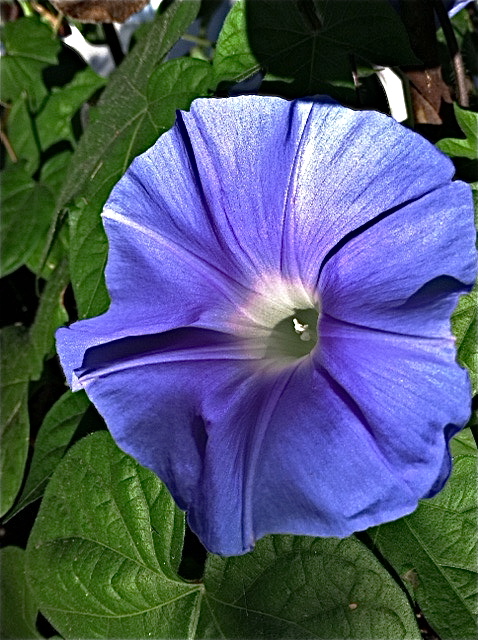
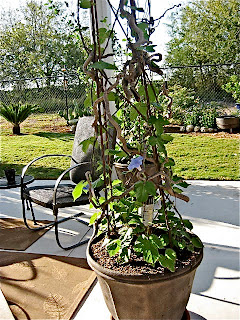 My morning glory experiment has been a success! They have already grown to the top of the wire trellises, and each day have more and more blooms.
My wildlife cam has mostly captured opossums and early morning birds, but I did find two rabbits...
 A cottontail...
 And a jack rabbit...
That's all for now. We'll post again if and when there's something to report.
 Our pet photo of the day shows Bandido taking a break in the water tub at the doggie park after retrieving his beloved blue whistle ball a hundred times (exaggeration -- just seemed that way). November is here, and a lot more of his Texas buddies are on their way south for some winter fun. Bandido and Tequila can't wait to see them, and neither can I!
Hi all, Dianne here. As shown above, the cattle next to our dog park have watched our return with interest! Our coach house sits right behind the tree line in the background of the photo.
Not much to update, but I wanted to share a link to a blog which recently showcased our tiny coach house in Texas. Even if you've seen photos of our coach house on our own blog, there are some great photos which really showcase it here:
"It's Only a Shed"
I've added a permanent link to this blog at the left margin of ours, if you are interested in future tiny coach house posts.
Aside from that, here's a quick update:
I've been riding my bike through the state park next door for exercise, and Tuesday morning I came upon this large bobcat.
He ignored me for a while, turning to look at me from time to time, then hopped into the brush along the road.This morning on my bike ride I saw a road runner. By the time I got my camera out and rode up to him, he ran into the brush to hide. You can just see his shadow in this photo. Maybe next time....
Then I had to stop and wait for this flock of chachalachas to cross the road.Our plantings are growing like weeds! My tomato plants already have blooms --They are growing in big pots that we can roll inside in case we get an overnight frost in January.
My morning glory experiment has been a success! They have already grown to the top of the wire trellises, and each day have more and more blooms.My wildlife cam has mostly captured opossums and early morning birds, but I did find two rabbits...
A cottontail...And a jack rabbit...That's all for now. We'll post again if and when there's something to report.
Our pet photo of the day shows Bandido taking a break in the water tub at the doggie park after retrieving his beloved blue whistle ball a hundred times (exaggeration -- just seemed that way). November is here, and a lot more of his Texas buddies are on their way south for some winter fun. Bandido and Tequila can't wait to see them, and neither can I!
29 Kasım 2012 Perşembe
Three ROCKIN' Scenic Geology Roadways
To contact us Click HERE
This summer I had the great pleasure of driving the Needles Highway (South Dakota Highway 87), the Chief Joseph Scenic Byway and the Beartooth All American Road (US Highway 212) for the first time on a trip to Bozeman, MT. I had heard and read great things about these routes and they certainly delivered stunning vistas and fantastic geology (even thought it was raining and incredibly windy in some locations). I've driven across the country a dozen or so times and taken various routes, but I would have to agree that these three highways provide some of the best geology 'watching' in the country!
The Needles Highway was a bit congested since Sturgis was in full swing but luckily the views looking up weren't impeded by the traffic. However, the day was cut short by a hail-producing thunderstorm.
I also stopped at Dead Indian Hill Pass (see my Gigpan of this location here). This stretch of the road is full of switchbacks and quite steep (stay in low gear!):
This is one of my favorite vantage points on the Beartooth - it isn't as 'scenic' as some other photos I took, but I really like the sense of scale, isolation, serenity, and rugged nature of this landscape:
And these are a view other views driving the Beartooth, I think the partly cloudy drizzle really adds a nice effect to this landscape:
The paternoster lake system you can see in the photos from the Beartooth Highway are spectacular, I personally haven't seen such an easily accessible view of this stunning an alpine landscape. I've always enjoyed paternosters, as much for their morphology as the etymology of the word - it roughly translates from Latin as "Lords Prayer" and the fact that they look like a chain of rosary beads. None of the photos or Photosynths do the drives justice, if you like driving and you like geology, then put these on your list of must-do drives in the western United States!
Living in a Seismic Gap Isn't So Bad... Yet.
To contact us Click HERE
After the magnitude 8.8 (MM) occurred just north of Conception Chile many friends, family, and colleagues were concerned my trip could be canceled. After quelling those fears, many became concerned about the idea that I would be living in 'earthquake and volcano country' with the added threat of possible tsunami activity. So I thought I would create a few maps to hopefully minimize concern while being honest, keeping in mind that anything is possible when you live on an active subduction zone. Subduction in this area occurs between the Nazca and South America Plates, producing dramatic topography, explosive volcanoes and powerful earthquakes.
Source: Allmendinger and González (2010)
Arica is a coastal city with approximately 190,000 residents located at 18° south latitude on the extreme northwestern edge of Chile. While historical earthquakes have indeed occurred within this region, little seismic activity has occurred here since 1877 because Arica resides within a seismic gap. This is generally not settling news since it represents a region where strain is and has been accumulating without release - meaning a considerable earthquake could hypothetically occur and Spence et al. (1999), and Berrocal et al (2004) have suggested that earthquakes in the late 1990s were precursors to a major event in the Arica 'elbow.' This is illustrated below as white ellipses, representing sections along the subduction zone that haven't experienced slip in the last century.
Source: Pritchard and Simmons (2006)
The last major event occurred in 1868 and completely leveled Arica and numerous coastal cities. This earthquake also produced a tsunami that added to both the local devastation and caused damage in New Zealand and Hawaii. This tsunami also left numerous ships stranded on land - similar to the events following the eruption of Krakatoa - such as the U.S. Wateree:
Source: Scribners Monthly
So I created some simple maps illustrating the tsunami inundation zone and historical earthquakes in the Arica region. To accomplish this I downloaded an inundation map produce by the Chilean Navy, exported the PDF as a tiff file and georeferenced it. Then I digitized the approximate boundary of the inundation zone and draped it over the topography (in relation to where I'm living and working) in ArcGIS and ArcScene to produce the following visualizations:
A simple 3D model illustrating how far both work and home are from the predicted inundation zone. The red flag represents the house, which is approximately 2.0 miles inland and the green flag is work and approximately 0.8 miles inland.
I created the earthquake magnitude maps by draping a Landsat image over a 30-m Aster-derived DEM and incorporating historical seismic data obtained from the USGS. This isn't very helpful other than illustrating how few earthquakes have occurred in this region since 1877. The large earthquake depicted in the center of the map represents the 1868 earthquake that caused so much devastation as depicted below:
Source: U.S. Library of Congress
So, while the images are visually jolting there's no real way of predicting when an earthquake will occur so I won't - and hopefully friends and family won't - spend too much time worrying about what might happen. I would be more concerned if I was living in San Francisco given the height of their buildings; it is rare to find buildings over 3 stories in Arica and they are all downtown. I'm also confident that if an earthquake occurs that produces a tsunami, even if I'm within the inundation zone, I will have plenty of warning and time to flee the mile inland necessary to avoid harm. After living in Vermont for the last 7 years, I'm a little excited about living on an active margin and embrace all the possible processes that are at work beneath the city. So, to anyone out there who is worrying, don't!
Source: Allmendinger and González (2010)Arica is a coastal city with approximately 190,000 residents located at 18° south latitude on the extreme northwestern edge of Chile. While historical earthquakes have indeed occurred within this region, little seismic activity has occurred here since 1877 because Arica resides within a seismic gap. This is generally not settling news since it represents a region where strain is and has been accumulating without release - meaning a considerable earthquake could hypothetically occur and Spence et al. (1999), and Berrocal et al (2004) have suggested that earthquakes in the late 1990s were precursors to a major event in the Arica 'elbow.' This is illustrated below as white ellipses, representing sections along the subduction zone that haven't experienced slip in the last century.
Source: Pritchard and Simmons (2006)"as the only segment of the Chile-Peru Subduction Zone not to have ruptured within the last 100 years, the north Chile segment is now considered to be a region at high risk from an earthquake similar to, or larger than, the 1877 Tarapaca or Iquique earthquake (Mw 8.3)" - (Benfield 2010)
The last major event occurred in 1868 and completely leveled Arica and numerous coastal cities. This earthquake also produced a tsunami that added to both the local devastation and caused damage in New Zealand and Hawaii. This tsunami also left numerous ships stranded on land - similar to the events following the eruption of Krakatoa - such as the U.S. Wateree:
Source: Scribners MonthlySo I created some simple maps illustrating the tsunami inundation zone and historical earthquakes in the Arica region. To accomplish this I downloaded an inundation map produce by the Chilean Navy, exported the PDF as a tiff file and georeferenced it. Then I digitized the approximate boundary of the inundation zone and draped it over the topography (in relation to where I'm living and working) in ArcGIS and ArcScene to produce the following visualizations:
A simple 3D model illustrating how far both work and home are from the predicted inundation zone. The red flag represents the house, which is approximately 2.0 miles inland and the green flag is work and approximately 0.8 miles inland.I created the earthquake magnitude maps by draping a Landsat image over a 30-m Aster-derived DEM and incorporating historical seismic data obtained from the USGS. This isn't very helpful other than illustrating how few earthquakes have occurred in this region since 1877. The large earthquake depicted in the center of the map represents the 1868 earthquake that caused so much devastation as depicted below:
Source: U.S. Library of CongressSo, while the images are visually jolting there's no real way of predicting when an earthquake will occur so I won't - and hopefully friends and family won't - spend too much time worrying about what might happen. I would be more concerned if I was living in San Francisco given the height of their buildings; it is rare to find buildings over 3 stories in Arica and they are all downtown. I'm also confident that if an earthquake occurs that produces a tsunami, even if I'm within the inundation zone, I will have plenty of warning and time to flee the mile inland necessary to avoid harm. After living in Vermont for the last 7 years, I'm a little excited about living on an active margin and embrace all the possible processes that are at work beneath the city. So, to anyone out there who is worrying, don't!
Busy Weather='s A Busy Me
To contact us Click HERE
Hey everyone,You may have noticed a lack of updates both here and on my website. Between work and chasing storms I've been pretty darn busy. I chased 3 days in a row last week. The 12th, 13th, and 14th of April. I figured I would make a blog post with a preview of some images so you would know what to expect when I get the actual accounts up on my website. Once that is done I will finally be working on uploading more images to my galleries. Anyway... the first day on the 12th (Thursday) looked good for some storms over Western and Northwest Kansas. There were some concerns about the strength of the cap the further south you went, but also concerns about gulf moisture making it far enough north to create favorable conditions for storms. We started the day in Nebraska and drove to Garden City, Kansas. Making it around 2pm. Soon after a tornado watch was issued for much of Northwestern Kansas and parts of Colorado and Nebraska. We moved slightly north and sat near Tribune watching storm towers rise and fall. It became obvious that the cap was going to hold and we needed to head north... so we went for developing storms near Goodland, Kansas along interstate 70. Once we caught up to the storm the wind shear was so strong it was of the low precipitation variety. Which made the storm visually interesting but not very strong. Here is a preview!  We stayed in Colby, Kansas for the night and awoke in the morning to a forecast that doubted whether we could get storms to form in Oklahoma before dark. But we decided to chance it. Storms fired very early (around noon) as we were just crossing the Oklahoma border. We finally reached a line of developing storms around 3pm. The cell we had targeted rapidly weakened as we approached near Chickasha, Oklahoma. As new storms developed to the southwest. We headed down interstate 44 towards Lawton, Oklahoma and then west. Reaching a high precipitation supercell near the Snyder, Oklahoma area in the Wichita Mountains area. Here is a quick preview from that storm!
  We stayed that night in Oklahoma City... and Saturday was supposed to be the big day. A rare 'high risk' of severe weather was issued by the Storm Prediction Center and they called for a tornado outbreak. We awoke early and crossed the Kansas border. Reaching the McPherson, Kansas area before heading west towards developing storms flying northeast across the state at 55mph. After being stuck in fog and low clouds on the early storms we elected to head to the south and west and get into clearer and more unstable air as more storms fired near Dodge City, Kansas and rapidly started to rotate. Here is a shot with a funnel cloud on the storm near Greensburg, Kansas! It ended up as a rather frustrating day as we would get in perfect positions on storms and they wouldn't produce. While the ones we had just left to the north had tornadoes on the ground, or another storm to the south would produce. Sometimes thats just the luck of chasing storms.
 Finally I'll sneak in one last photo from my trips to Badlands National Park (I'm working on an image account for this as well) Enjoy! Feel free to let me know what you think, and thanks for your patience as I complete all of these updates!
  Thanks again,Chris
We stayed in Colby, Kansas for the night and awoke in the morning to a forecast that doubted whether we could get storms to form in Oklahoma before dark. But we decided to chance it. Storms fired very early (around noon) as we were just crossing the Oklahoma border. We finally reached a line of developing storms around 3pm. The cell we had targeted rapidly weakened as we approached near Chickasha, Oklahoma. As new storms developed to the southwest. We headed down interstate 44 towards Lawton, Oklahoma and then west. Reaching a high precipitation supercell near the Snyder, Oklahoma area in the Wichita Mountains area. Here is a quick preview from that storm! We stayed that night in Oklahoma City... and Saturday was supposed to be the big day. A rare 'high risk' of severe weather was issued by the Storm Prediction Center and they called for a tornado outbreak. We awoke early and crossed the Kansas border. Reaching the McPherson, Kansas area before heading west towards developing storms flying northeast across the state at 55mph. After being stuck in fog and low clouds on the early storms we elected to head to the south and west and get into clearer and more unstable air as more storms fired near Dodge City, Kansas and rapidly started to rotate. Here is a shot with a funnel cloud on the storm near Greensburg, Kansas! It ended up as a rather frustrating day as we would get in perfect positions on storms and they wouldn't produce. While the ones we had just left to the north had tornadoes on the ground, or another storm to the south would produce. Sometimes thats just the luck of chasing storms.Finally I'll sneak in one last photo from my trips to Badlands National Park (I'm working on an image account for this as well) Enjoy! Feel free to let me know what you think, and thanks for your patience as I complete all of these updates! Thanks again,Chris
If it's May... you chase!
To contact us Click HERE
Hey everyone... I have so much work to do after the last week. I have been planning to make quite a few website updates but have been chasing storms for the past week. May 1st, 2nd, 4th, and 5th were all chase days. I also went out locally around sunset to timelapse some distant storms on May 3rd. After all of that time in the car I've been recovering and getting some work done the last few days and am finally getting around to work on things. On May 1st... I chased in Southwestern Minnesota and Northwest Iowa and got a brief tornado warned supercell! 
 There was also a decent light show after dark!
  Then on May 2nd, I chased in Southern Nebraska where the cap finally broke just before dark. A supercell tried to wrap up above my head!
 Then I captured the best cloud to ground strike I had ever gotten on the way home!
  On May 3rd... I went out around sunset to timelapse some local convection, I also included a timelapse of the supercell developing near Fullerton the previous day. http://www.youtube.com/watch?v=PDiZ1RAS0TIMay 4th was a very frustrating day, where supercells tried to get going and constantly weakened right as we would get to them. Here is a quick shot of some mammatus from a dying storm and then a stack of lightning images after dark near Norfolk.
 May 5th was the worst day of the bunch... a strong cap stopped storms from developing and we basically got a tan with 1000 other chasers. That being said it was great to chat with friends and put some facebook faces to names in the real world. Ill keep you updated here as I get these accounts done! Thanks,Chris
There was also a decent light show after dark! Then on May 2nd, I chased in Southern Nebraska where the cap finally broke just before dark. A supercell tried to wrap up above my head! Then I captured the best cloud to ground strike I had ever gotten on the way home! On May 3rd... I went out around sunset to timelapse some local convection, I also included a timelapse of the supercell developing near Fullerton the previous day. http://www.youtube.com/watch?v=PDiZ1RAS0TIMay 4th was a very frustrating day, where supercells tried to get going and constantly weakened right as we would get to them. Here is a quick shot of some mammatus from a dying storm and then a stack of lightning images after dark near Norfolk.May 5th was the worst day of the bunch... a strong cap stopped storms from developing and we basically got a tan with 1000 other chasers. That being said it was great to chat with friends and put some facebook faces to names in the real world. Ill keep you updated here as I get these accounts done! Thanks,Chris
Walt Disney World's Behind the Seeds Tour at Epcot
To contact us Click HERE
I’ve been to Walt Disney World in Orlando, Florida, three times. That is to say, I’ve vacationed there in three different years for 7-10 days on each trip. The fact that I went back several times should be a hint as to whether I enjoyed it. Rather than review the entire thing, I’m going to break it down into several parts. Today, I’m going to discuss the Behind the Seeds Tour at Disney’s Epcot theme park. The Behind the seeds tour takes you backstage of the Living with the Land ride. On the ride, you see brief glimpses of some of the amazing greenhouse plants that are growing in the pavilion, but you’re riding by at the pace set by the boat in which you ride, and you don’t get the opportunity to linger, ask questions, and see all the stuff that’s hiding behind the curtain.The Behind the Seeds tour is for those with a little more curiosity. Each tour group walks through the greenhouses and past the aquaculture tanks and gets to see how Disney grows mouse ears on pumpkins among other marvels. In the greenhouse, for example, they have a giant tomato plant that, our tour guide told us, can produce more than 1150 pounds of tomatoes all by itself over the course of its 18 month lifespan. Guests of the Behind the Seeds tour will learn how to make basic hydroponics systems in their own home and will learn about the various kinds of hydroponics systems. Much of what Disney grows there is done hydroponically and the vegetables and fruits produced on site are used in the meals prepared by resort’s restaurants. The tour guides, as you would expect, are very knowledgeable and are willing to take as much time as it takes to make sure everyone’s questions are answered. Guests also get to feed the tilapia in the aquaculture tanks. There is also an alligator pond in the aquaculture area as well. When you get a little tired of whizzing around on all the rides and want to stimulate your brain and actually learn a little something, The Behind the Seeds Tour is certainly one of my favorite attractions at Disney World.The tour lasts about an hour and costs $18 per person (on top of your Walt Disney World entrance fee). Children aged 3-9 pay just $14 each, but honestly, those at the younger end of that range should probably skip this tour. Sure, they’ll enjoy throwing a handful of feed to the fish and seeing the Mickey Mouse shaped pumpkins, but learning about nutrient film hydroponics systems is not nearly as exciting as Mr. Toad’s Wild Ride and their patience will certainly be tested. Teens and naturally inquisitive kids will love it though and it makes a great change of pace for those who are spending several days on their Disney Vacation.
28 Kasım 2012 Çarşamba
Garrett's Log Entry
To contact us Click HERE
Today is the 24th of May, and i had a long day. We started the day by leaving a little earlier then noon to go to the aquarium. An institute that has problems with its mission prerogative. To save animals is important, to enclose and monitor nature is not within that goal. But, it was cool, i saw an octopus! Then we went to Virginia Beach, where the water is suprisingly welcome after getting used to it. Swimming is fun! Sand, clinging to every part of your body, is not. Following that, we had our dinner at a really good pizza place, i had a pitcher of tea! The last activity of my day was a walk along the beach, which was very relaxing, and helped me with my zen, sorta. The moon is behind clouds right now, which makes me a little bit sad, but i am going to bed! Hi mom! This was a blog post by Garrett VanHecke.
If it's May... you chase!
To contact us Click HERE
Hey everyone... I have so much work to do after the last week. I have been planning to make quite a few website updates but have been chasing storms for the past week. May 1st, 2nd, 4th, and 5th were all chase days. I also went out locally around sunset to timelapse some distant storms on May 3rd. After all of that time in the car I've been recovering and getting some work done the last few days and am finally getting around to work on things. On May 1st... I chased in Southwestern Minnesota and Northwest Iowa and got a brief tornado warned supercell! There was also a decent light show after dark! Then on May 2nd, I chased in Southern Nebraska where the cap finally broke just before dark. A supercell tried to wrap up above my head! Then I captured the best cloud to ground strike I had ever gotten on the way home! On May 3rd... I went out around sunset to timelapse some local convection, I also included a timelapse of the supercell developing near Fullerton the previous day. http://www.youtube.com/watch?v=PDiZ1RAS0TIMay 4th was a very frustrating day, where supercells tried to get going and constantly weakened right as we would get to them. Here is a quick shot of some mammatus from a dying storm and then a stack of lightning images after dark near Norfolk.May 5th was the worst day of the bunch... a strong cap stopped storms from developing and we basically got a tan with 1000 other chasers. That being said it was great to chat with friends and put some facebook faces to names in the real world. Ill keep you updated here as I get these accounts done! Thanks,Chris
There was also a decent light show after dark! Then on May 2nd, I chased in Southern Nebraska where the cap finally broke just before dark. A supercell tried to wrap up above my head! Then I captured the best cloud to ground strike I had ever gotten on the way home! On May 3rd... I went out around sunset to timelapse some local convection, I also included a timelapse of the supercell developing near Fullerton the previous day. http://www.youtube.com/watch?v=PDiZ1RAS0TIMay 4th was a very frustrating day, where supercells tried to get going and constantly weakened right as we would get to them. Here is a quick shot of some mammatus from a dying storm and then a stack of lightning images after dark near Norfolk.May 5th was the worst day of the bunch... a strong cap stopped storms from developing and we basically got a tan with 1000 other chasers. That being said it was great to chat with friends and put some facebook faces to names in the real world. Ill keep you updated here as I get these accounts done! Thanks,Chris
Kaydol:
Kayıtlar (Atom)